是在flex定义部分中声明,开始状态(start states),也称为 开始条件(start conditions) 或者 开始规则(start rules)。
开始状态的作用
是用来限制特定规则的作用范围,或者针对文件的部分内容来改变扫描器的工作方式。即根据开始状态激活对应的规则(rules)。
开始状态的模式
开始状态有2种模式:
- %s :inclusive (包含模式),它允许未标记任何开始状态的rule 可以进行匹配。
- %x:exclusive(独占模式),它只允许标记为该开始状态下的rule 进行匹配。通常独占模式更有用。
注意:在 flex定义部分中声明时 使用非缩进的形式。例如:
/* definitions 定义部分 */
%{

%}
%s simple
%x test
%%
/*rule action  规则和执行动作 部分*/
<simple>[0-9]+ {}
<test>[a-z]+ {}
%%
/* helper function 辅助函数部分*/
注意在规则部分中:开始状态名称和rule之间是没有空格的。
开始状态的激活
开始状态的激活需要使用:宏 BEGIN 进行激活。BEGIN的语法:
BEGIN statename;statename 是使用 %x 或 %s 声明的开始状态名称。Flex默认的开始状态是 零 状态,也称为 INITIAL。BEGIN(0)等价于 BEGIN(INITIAL)。
注意:宏 BEGIN 本身是没有任何参数的,状态名字也不应该被括号括起来,但是加括号是一种良好的风格。
示例
分别使用2种状态模式对字符串数字”123.45″进行识别:
%{
    #include <stdio.h>
    #include <math.h>
%}

%s expect

%%

"expect-floats" BEGIN(expect);

<expect>[0-9]+"."[0-9]+ {
    printf("found a float,=%f\n", atof(yytext));
}

<expect>\n {
    /* BEGIN(INITIAL); */
}

[0-9]+ {
    printf("found an integer, = %d\n", atoi(yytext));
}

"." {
    printf("found a dot \n");
}

%%

int main()
{
    yylex();
    return 1;
}
CMakeLists.txt
cmake_minimum_required(VERSION 3.20)

project(startConditionTest LANGUAGES C)

find_package(FLEX)

FLEX_TARGET(myscanner startcondition_test.l ${CMAKE_CURRENT_BINARY_DIR}/startConditionTest.lex.c)

# 设置主要包含的c文件
set(MAIN_SRC ${CMAKE_CURRENT_BINARY_DIR}/startConditionTest.lex.c)

# 使用源文件生成可以执行文件
add_executable(conditionTest01 ${MAIN_SRC})

# libfl.a
find_library(LEX_LIB fl)
TARGET_LINK_LIBRARIES(conditionTest01 ${LEX_LIB})
包含模式%s
使用包含模式:%s expect.
编译并执行:
mkdir build
cd build
cmake ../
make
# 执行
./conditionTest01
123.45
found an integer, = 123
found a dot
found an integer, = 45

"expect-floats" 123.45
"" found a float,=123.450000
123
found an integer, = 123
执行结果如下图所示:

独占模式%x
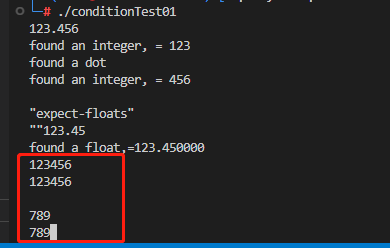
使用独占模式:%x expect
编译执行:
└─# ./conditionTest01
123.456
found an integer, = 123
found a dot
found an integer, = 456

"expect-floats"
""123.45
found a float,=123.450000
123456
123456

789
789
如下图所示:
总结
从执行结果上面可以看到:
- 独占模式被激活时,没有标记任何开始状态的rule,将不会被匹配。
- 包含模式被激活后,未标记开始状态的rule 也是可以进行匹配的。
- 和开始状态的模式小节中描述的是一致的。